How to do a Handstand for Beginners – Best Tips & Benefits
The journey to handstand may not always be easy. What’s more, is that it may sound discouraging, but your success will depend on your end goal, background, genetics and your commitment. How to do a handstand for beginners? Simple, you balance on your hand, but why? What are the benefits? The hardest part is understanding the logistics to be able to hold in one spot. Yes, you can learn from videos and books, but the most important thing is to just do it and commit.
What is not helping, videos showing people being able to hold a handstand in the middle of the room for at least 10 seconds after 30 days. This might not be realistic for most people.
This post contains affiliate links, which means I receive a small commission, at no extra cost to you. If you make a purchase using this link, you may allow me to buy coffee while I write! Please see my disclosure for more details.

My journey and how I learn to do a handstand
When I started my journey, I truly believed that after a few months, I would be able to hold a handstand in the middle of the room for 10 seconds. Long story short, it’s still not the case. I started to commit to a more daily practice in July 2020 and today January 2024, I can hold for maybe 7 seconds when it feels right. But most days it is still difficult and I don’t have full control.
- Did I do a regimented handstand practice? No
- Did I do all the required core and shoulder training I should have? No
When I started, I was using the wall, which if that’s you, you should too. I could not kick up for the first 5 months, I had a lot of work to do on opening my hips, and providing enough length to my legs to do so. That is not to mention the lack of shoulder and core strength.
If it were easy, everyone would do it.
There are so many components that come with handstands, it is not easy in any way and if like me you have no gymnastic background, and limited flexibility it may take you longer than others. (Especially if you skip all the workouts because they aren’t that fun).
To follow my journey to handstand and my celebrations, follow me on Instagram @bee.there.or.bee.square.yoga.
How to do a handstand for beginners?
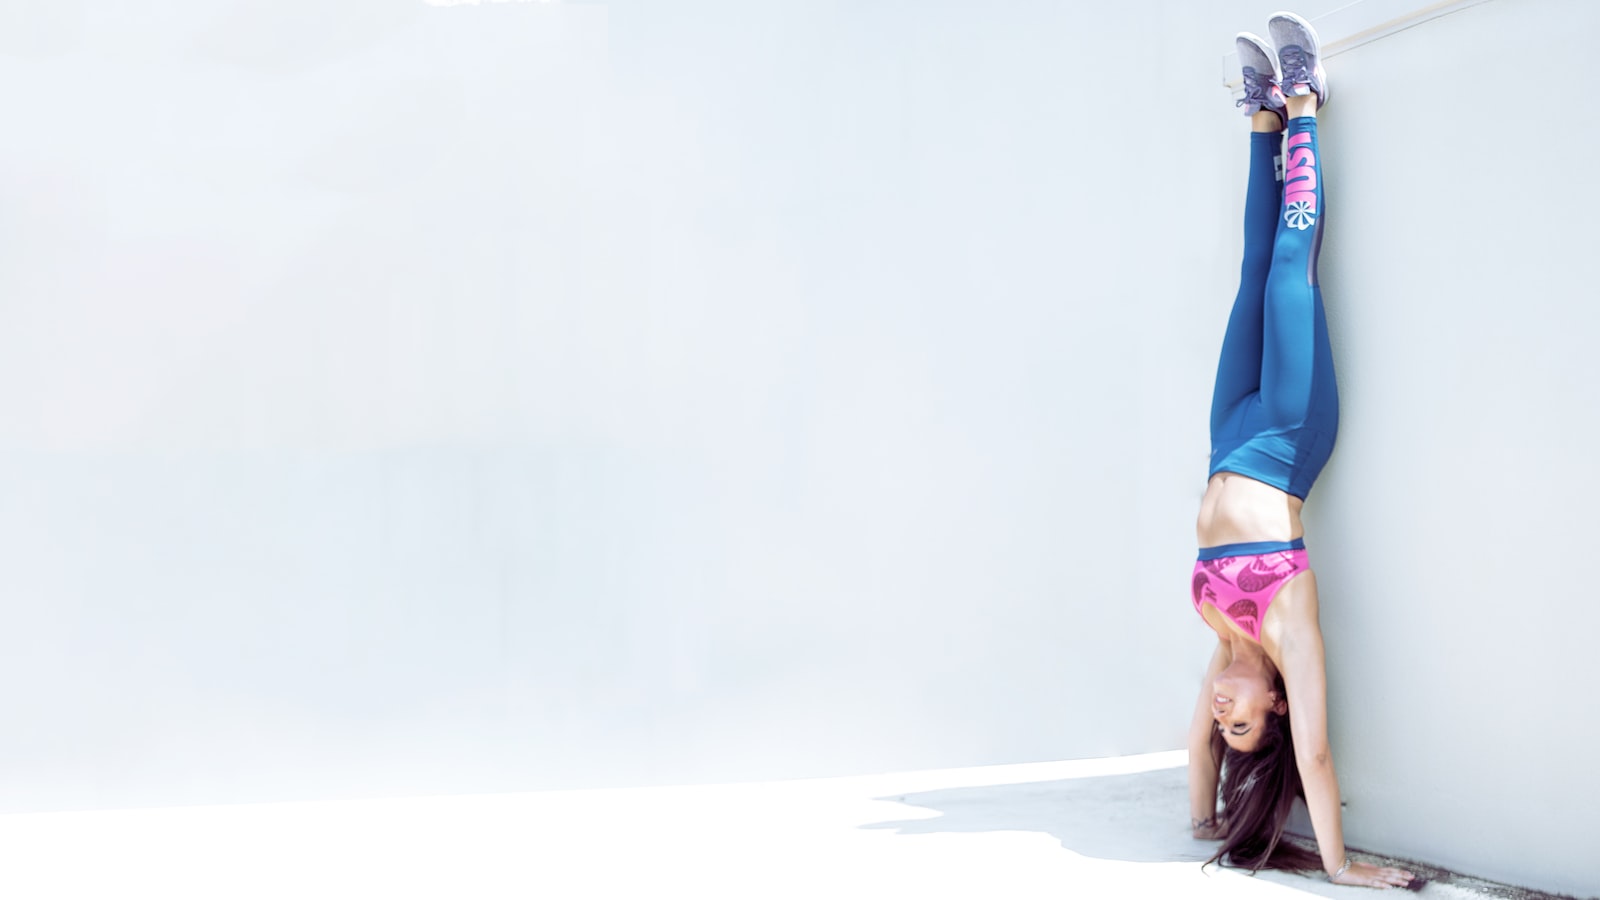
If you have been practicing for a while, you do have to let go of the wall at some point to get your freestanding handstand. If you have never attempted a handstand, find a wall to support you, either put your hands on the floor and walk up the wall or attempt to kick up. The same would apply to the headstand and forearm stand. The following steps will assume you did a proper warmup, especially for your wrists. In the event you have not, you can find a warm-up here with some recommended videos.
Wrist Warm-up Routines for Handstand
Warm-up Routines for Handstand
30-Day Handstand Challenge – Track your daily progress

In addition, track your daily handstand progress from your yoga journey or if you want to build a new fitness habit for yourself. Build your habit and follow your journey with this original and creative 30-day handstand challenge. Colour each day following the numbers and see your progress grow! Follow your mental strength while creating beautiful art and feel accomplished!
Step 1 – Measure to find your shoulder and hand placement
- First, sit in front of the wall with your legs straight and your feet flat against the wall. This will provide you with the measurements of your legs and how far you should be from the wall. Place your hands next to your butt and flip over.
- Your hands should be shoulder-width apart and your fingers should grip the floor like you are holding for dear life to a ball or a mat under you.
Note: If you are scared, you can always put a mat under you.
Step 2 – Walk up the wall
- Second, find a downward dog position and start to slowly walk your feet up the wall.
- You will have to put more weight onto your hand the more you walk up the wall, if you can hold continue to step 3. If not just build your arm and shoulder strength with downward dog and going up and down the wall.
If you start feeling dizzy in downward dog, do not move forward. The pose is considered an inversion and you may need further training.
Step 3 – Walk your hands closer to the wall
- Third, if your feet are as high as they can be and you feel strong, start to walk your hand closer to the wall.
Note: If this is too difficult, go back to step 2
Step 4 – Practice your straight handstand
- Fourth, walk your hand as close to the wall until your chest can touch the wall.
- To practice having a straight back, you should have your forehead, chest and thighs touching the wall.
Note: The more you practice handstand, the better you are at “stacking” your entire body on top of each other, it will become to hold your handstand. The best advice is to avoid having a “banana back”.
Step 5 – Build strength
- Fifth, increase the time you can hold facing the wall by 5-10 seconds each time.
Step 6 – Safely come down
- Lastly, to get down, either cartwheel out to your side, walk your hand back to its starting position, and bring your legs down until you reach the floor and return to your downward dog position.

Why is learning to stack your body is important?
One fundamental part of learning how to do a handstand for beginners will be your ability to hold for a longer period. You will be able to understand how to stack all your body parts on top of each other.
Stacking the hips over the shoulder over the wrists. One tip I found that helps me keep my back straight is where I look while upside down. When you first start, you may want to look between your hands, which will strain your neck. By looking 3 inches behind your hand, you will help your neck and help your back to not curve so much to counterbalance. Which is referred to as a banana back.
These amazing questions from The Asana Academy, can help you determine what this means:
- Do I feel excess pressure on my lower back every time I jump to a handstand?
- Do I “thud” on the ground every time I land?
- Do I feel heavy when I jump?
- Do I look like a horse when I jump?
- Where do I feel the weight in my hands?
These are symptoms of not properly stacking the hips. In addition, this is how you learn a handstand. If you are not 100% sure of your form, you will have to start filming yourself to notice what you look like.
Stacking ability will also vary based on how open your shoulders are, how strong your back and core muscles are and your ability to send your hips over your shoulders almost like it will stack in place.
When you believe your hips are stacked, you can move them forward another 2-3 inches.
4 Main benefits of handstands
- Work your core strength
- Increase your balance
- Increase circulation
- Build your back, shoulder and arm strength

Why are handstands so important in yoga?
Whether or not you are familiar with yoga, handstands are a big component for advanced practitioners. Over time, you start to develop a practice that provides you with the necessary muscles and mobility to make your handstand journey a little easier.
While learning other poses, like arm balances, inversions etc. you can develop your mobility and strength to have better success in your handstand journey. The following 6 yoga movements can be used to develop your muscles and help you learn inversion and how to be upside down.
Three-legged downward dog or downward dog
This pose will build strength in your shoulders and a pose like downward-dog is considered an inversion. When you start to practice handstands, you do have to get used to having your head down, which can be a bit scary at first. Simpler movements can help you develop that feeling without putting your entire body on your head.
Downward dog as mentioned above, will be a great way to build your awareness to be upside down, you build your shoulder strength and hand strength.
Plank & Chaturanga
Since some of your balance will come from your body strength, plank & chaturanga will develop your arms, shoulders, core and back strength. Which are all necessary to be able to hold a handstand. You may also be creating bad habits, which in the long run will not bring you to the next level you may want.
Headstand
Headstands will develop your capability to be upside down. It is an easier inversion that can increase your body awareness without using your hands and shoulders to support you. In my experience as a yoga teacher, I would highly recommend starting with headstands and developing your awareness that way.
Standing forward fold
This movement is an easier variation of downward dog to learn to be upside down, letting the blood flow rush to your head is something you will have to get used to.
Puppy Pose
Puppy pose is great for opening your shoulders over time and allows you to have less of a “banana back” while practicing.
There are a lot more poses that can help you, but starting with these can help you build awareness and strength without only being in a handstand.
If you are seeking more tips on how to start your yoga journey, don’t miss my other article 24 Crucial Tactics – Best Tips for Yoga Let’s Start Your Own Journey.
How to get started with your handstand
Whenever you start something you never will have all the information you should, part of starting a new hobby, fitness regimen or even a diet is that you learn a lot along the way.
Start building a practice and be consistent.
As I mentioned in my journey to handstand, I wished I had not skipped all the core workouts and shoulder mobility that is required in your handstand.
What I recommend to get you started:
- Find a wall where you have enough space to go up and down and you will not break anything if you fall
- Practice core workouts at least 2-3 times per week (for example, superman hold, hollow body etc.)
- Learn some mobility drills, like L-Stands, walking up and down the wall
- Be patient, it may not take 30 days, but your progress will be fun and celebrate along the way!
Avazera Superfoods Bundle

Our Avazera superfood bundle has our top superfood powders for you to enjoy your daily source of vitamins, minerals and antioxidants.
Bundle Includes:
Baobab Powder (113g)
Raw Cacao Powder (113g)
Ashwagandha Powder (113g)
Red Maca Powder (113g)
Avoid doing a handstand if you experience some of the following
- Any back, shoulder, or neck concerns
- A heart condition
- High or low blood pressure
- Any concerns with blood moving to your head
- Glaucoma
Additional benefits you may not know
Handstand will:
- Boost your mood
- Reduce stress hormones
- Build your core muscles
- Increase your upper body strength
Frequently Asked Questions
The last thing you need to know about how to do a handstand
The journey to handstand can be quite wonderful, but challenging, it can make you feel strong, yet discouraged at times. Most of it will come from your consistency and mindset, by removing some of the goals you have and simply building your strength and awareness you will be able to enjoy every change and every step.
I am always seeking more ideas to write, if you would like to see more articles about handstands or yoga send me an email!